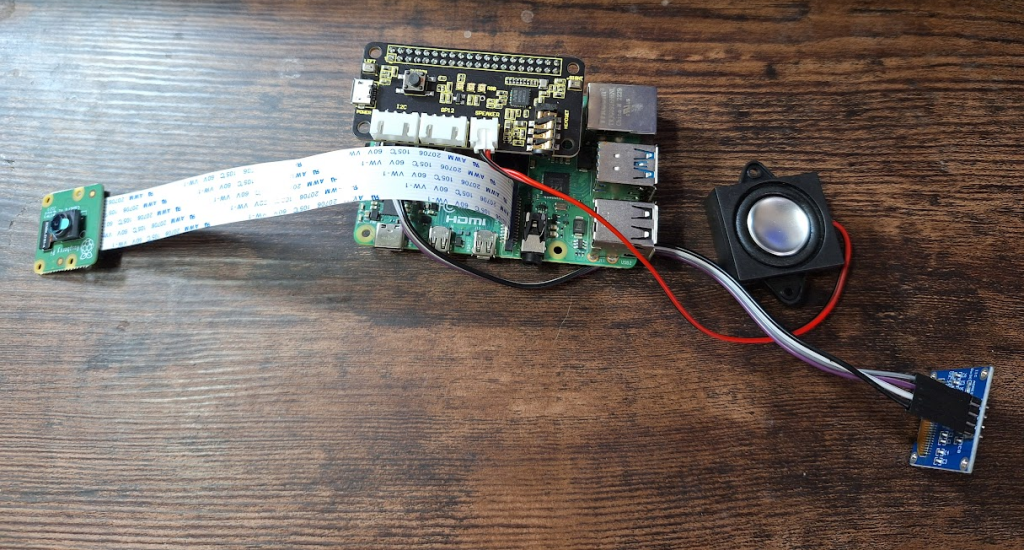
LilL3x on anything other then a reSpeaker is not officially supported, but I know that people will want to use the hardware that they have, and those old AIY kits are just gathering dust!
A user shared with me the information to get the HAT up and running, and I wanted to pass this knowledge onto you.
BIG THANKS to mjlill for sharing this with me! See the original post here.
First, you want to update your config,txt file. Open it in nano:
#dtparam=audio=on                   # comment this line out
#dtoverlay=vc4-kms-v3d              # comment this line out
dtoverlay=vc4-fkms-v3d              # add this line right below the one above you commented out
#dtoverlay=wm8960-soundcard         # comment this line out, if exsists
dtoverlay=googlevoicehat-soundcard  # add to end
Delete the contents of the file and replace with this:
options snd_rpi_googlevoicehat_soundcard index=0
pcm.softvol {
    type softvol
    slave.pcm "hw:sndrpigooglevoi"
    control {
        name Master
        card 0
    }
}
pcm.micboost {
    type route
    slave.pcm "hw:sndrpigooglevoi"
    ttable {
        0.0 30.0
        1.1 30.0
    }
}
pcm.!default {
    type asym
    playback.pcm "plug:softvol"
    capture.pcm "plug:micboost"
}

ctl.!default {
    type hw
    card 0
}
If you are using the AIY HAT, you will also have to tell LilL3x where the button is. On the reSpeaker, it’s mapped to pin 17, but on the AIY it’s mapped to 23. You might as well set the leds as well while you are there:
cd ~/LilL3x
source bin/activate
python config.py w BUTTON 23  # can also set this on the configuration website
python config.py w LED_TYPE AIY_LED
python config.py w LED_PIN 25
Reboot and your sound card should work! Remember that LilL3x runs at startup, so you won’t be able to do any testing until you quit the process. If LilL3x is running, you can always quit her by doing this:
cd ~/LilL3x
touch .quit
log
When the log quits, you are free to do any testing you need to do.
Who hasn’t wanted their own little AI sidekick? Imagine having a friendly little chatbox sitting on your desk, checking in with you and always up for conversation. This beginner’s Raspberry Pi project will set you up!
This project assumes:
that you are comfortable with Linux, namely installing packages and transferring files.
You have experience with 3D printing and printing models off the Internet.
You know how to setup and SSH into a Raspberry Pi, and are able to wire the GPIO
You are comfortable signing up for various external services (ie ChatGPT) and receiving API keys and secrets/passwords, etc. (Note that these services are not free, but the cost tends to be negligible and often within a free tier.)
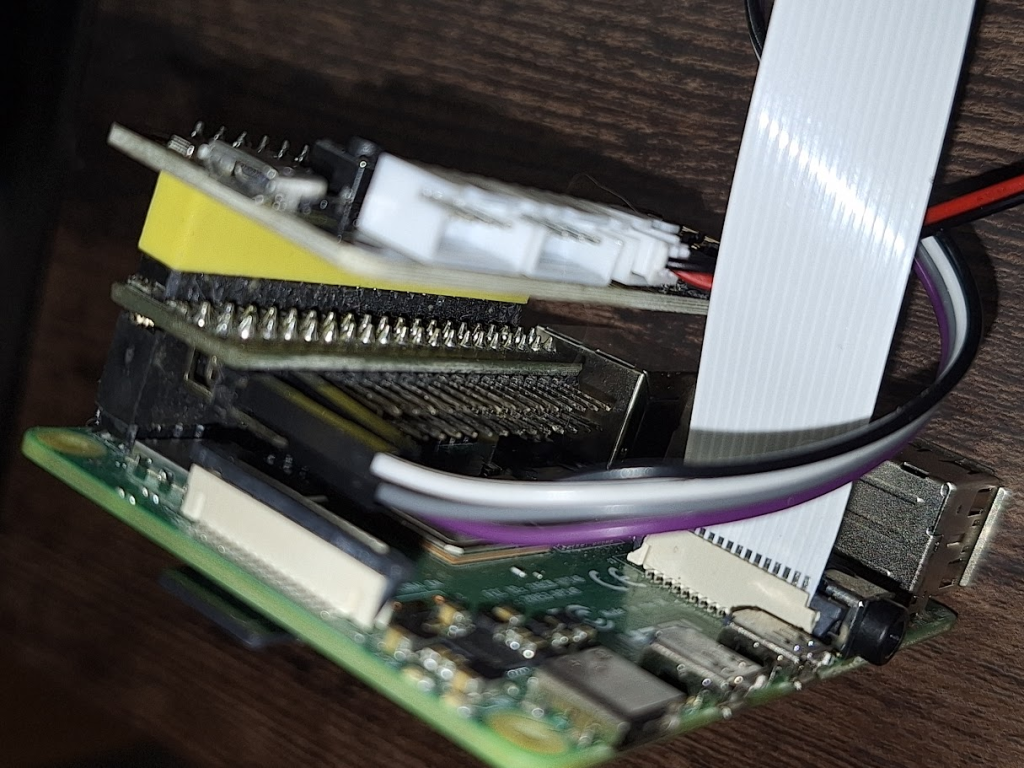
Attach the 90 degree connector to the GPIO pins on the PI. (This will allow you to install a hat while also taking advantage of the GPIO pins.)
Set up the screen (use the pins sticking out to the side, not the ones on top):
connect the SDA pin on the screen to pin 3
connect the SCL to pin 5
Connect the power and the ground to pins 2 and 6 respectively.
Use jumper wires to attach pins 1 and 9 to the power (red) and ground (black) of the fan. Note: it might be good to skip this step until you are ready to put the unit in the case.
Attach the ReSpeaker 2-Mics Pi HAT to the top of the connector. Take a minute to make sure that the pins are lined up correctly!
Attach the speaker to the hat in the rightmost port. It’s tricky to get in, the exposed wires face downward.
Side view:
Installation
Next step is to prepare the Pi. Instructions for this can be found here: Setting up your Raspberry Pi. Follow the “headless” path. I suggest you set the hostname to your AI’s name. Come back once you are SSH’ed into your Pi.
Note that LilL3x is only supported on trixie at this time, bookworm is not supported.
First, test the camera. Check that your camera is recognized:
rpicam-hello --list-cameras
Note: if you are using a USB camera it won’t appear in this list.See here for information on setting up the USB camera.
If you camera is not found, unplug your pi, double-check the connections, and reboot. The blue stripe should be facing the USB port.
Once you’ve gotten to a SSH shell with a working camera, download and run the setup script:
The website will install first, wait until it is finished and press enter to acknowledge. Then you are free to start configuration.
You will be asked to reboot at one point during the process. Say No.
When you are done, you will still need to setup the audio card, see below.
Configuring LilL3x
Configure LilL3x while install is finishing. If you go to the Raspberry PI’s IP on a web browser, you should now see a menu and a configuration link. Click “configuration”. (LilL3x will work with the default configuration and you can change it at any time, so feel free to put off this step.)
Most of the defaults are fine, but you will want to fill out:
Your info and your AI’s name
The AI engine that you will use (ie ChatGPT), along with an API key and model
Wake: PicoVoice is no longer free, so if you don’t have an account openWakeWord is your best bet. You can also choose a wakeword from the defaults if you don’t plan to make your own. Note; the default wakewords won’t show up yet, but they will appear after the install process is complete.
Speech Tools: Choose a speech engine, enter your credentials and choose a voice
Follow the instructions to create a new wake word (costs about $4) or select an existing one from the library (free)
Download the .onnx file and use ftp to upload it to ~/LilL3x/wake. Change the file name to remove the number, if you want, just make sure it ends with .onnx.
Select the new wake word on the configuration webpage. (You may need to refresh.) Note that the default wake words won’t appear until after the install process is complete.
Sign up for an account, if you are able to. Pico’s free tier seems to be going away.
Create a new wake word and download the zip to your computer
Unzip the file
Use FTP to move the file to ~/LilL3x/wake. Do not change the file name.
Select the new wake word on the configuration webpage. (You may need to refresh.) Note that the default wake words won’t appear until after the install process is complete.
If PicoVoice and openWakeWord is not an option, you can use Vosk which will (attempt) use your AI’s name as a wake word. Word of warning: this does not work well.
Get an Imgur Key
An imgur Client ID key is needed to upload files to imgur. Some models, such as ChatGPT, need a web address to an image file and imgur is used as a middleman.
Go to account settings (in the profile picture on the upper right)
Select “Applications” from the left sidebar
Create a new Client ID and insert it into the “Camera” section of the configuration page, in field for the Imgur Client ID.
Setting the audio device
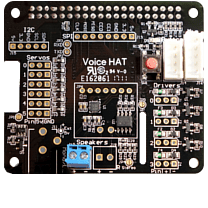
If you are using a AIY voice HAT, see these instructions.
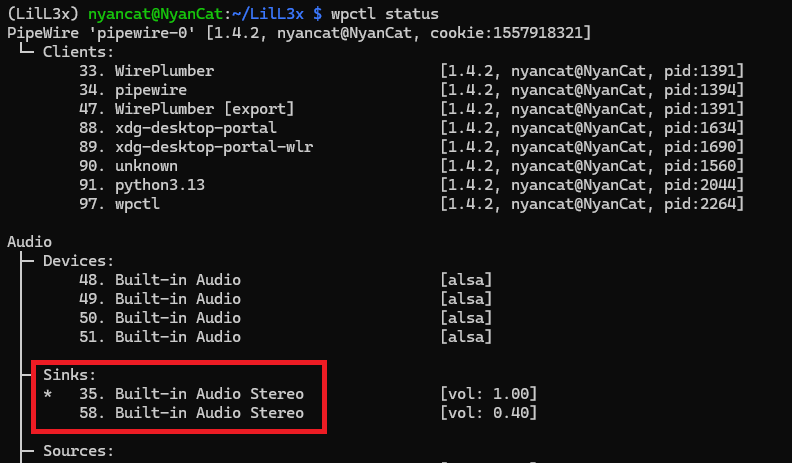
Let’s go back to the install. (It’s probably waiting for you– just a reminder, don’t reboot yet!) When the install script completes, you have to set the default audio device.
As of trixie, raspi-config can no longer set the sound card. I am working to automate this, but currently you need to find and set the audio sink on your own:
Get the status of Pipewire by calling wpctl status
Look for the sinks listed in Audio: Sinks, and try the one that isn’t selected. Remember the ID.
Inspect the ID with wpctl inspect to make sure it’s the right sound card (seeed-2mic-voicecard)
So in this case above, you’d want to inspect sink 58 to see if it’s the correct card. If it matches, then select it as the default.
Testing
Please Read! If you’ve come here after installing and rebooting (ie to fix the camera) you will need to keep in mind that the below tests should only be run when LilL3x is not running. otherwise they will fail. (Of course, if LilL3x is running, the best way to test it is to use it, so testing might not be necessary.)
After install LilL3x will run on boot, so when you boot up your Pi LilL3x is launched. You will have to end the process before continuing, if you want to test.
To check if LilL3x is running:
ps -A -f | grep lillex.py
If that shows processes (ignore the grep process), then you should stop it before proceeding. Ask it to stop with this:
cd ~/LilL3x/
touch .quit  # ONLY if lillex is running!!!
Wait about 10 seconds and then see if the process is still running. If it is, you might have to kill it. You can also type log to see if the program is shutting down or not.
Now that we’ve installed, lets test to make sure everything is working. We can do this without a reboot. First get into the virtual environment:
cd ~/LilL3x
. bin/activate
Your prompt should start with “(LilL3x)” now. If it doesn’t the below tests will fail.
Start with the screen. Test the screen with this command (do this even if you don’t have a screen– to test the install):
python stats.py
If you get “ModuleNotFoundError: No module named 'board'“, then that’s because you were naughty and said “Yes” when you were asked to reboot during install. You can either run the entire install script again, or just run everything you missed. Start with adafruit-circuitpython-ssd1306 and run everything after that. The install script is here: ~/LilL3x/install/install.sh.
Otherwise If nothing is appearing on the screen, or you get errors: check is that it is wired correctly. You might want to perform the rest of the tests first.
Press the button on the reSpeaker to move on.
You can test the microphone and speaker this way:
python speech_tools.py # test the speaker
python listen_tools.py # test the microphone (say 'quit' to end)
Move on to the next test, which will show the camera view on the screen.
python camera_tools.py
If after a few seconds, if you see LilL3x winking at you but no video, then there is likely a hardware issue with your camera or ribbon. The errors in the terminal should give you some clues. If you are using a USB camera, then check your device with v4l2-ctl --list-devices and make sure the device ID on the configuration webpage is set to the top number on your device. See here for information on setting up the USB camera.
Press Cntl-C to exit the camera test. It will take a picture first to test the Imgur connection, then quit.
Start It Up!
You have installed all the needed software for LilL3x, and it’s time to sudo reboot. If everything is going well you will see a screen welcoming you to your project and showing your IP. Press the button on the reSpeaker to continue. Be patient, LilL3x takes a bit of time to boot!
SSH in and type log while LilL3x is booting. This will tail the log (control-c to exit). If you get a “No such file or directory” error, wait until the screen changes to a logo and try again– the log hasn’t been created yet.
The log will also be vital in helping you debug your engine (AI, speech, etc) connections. If you get an error, the log will give you the details.
Press the button on the audio HAT to wake LilL3x if the wake word isn’t working.
If you didn’t change the AI Engine, the one that comes pre-set is “Eliza“, one of the earliest known chatbots built by Joseph Weizenbaum at MIT.
Note: if you just change an key for an engine (ie, your openAI key) but not the engine itself, the engine itself won’t reload. After saving the key, click the reload button to reload the engine.
Other things:
The button has a few uses:
Press the button until you hear a beep to “wake” LilL3x. This is the same as using the wake word.
Hold the button until you hear a second beep to restart the application
Keep holding until you hear two beeps to reboot the Pi
In a terminal window you can control program flow. While in ~/LilL3x:
type touch .restart to restart the program
type touch .reboot to reboot the pi
type touch .quit to quit the program. This is useful for debugging issues.
There are a number of programmed phrases that do specific things, including
“Show me what you see” (useful to test the camera)
“What’s your IP address?”
Finally, know that LilL3x doesn’t like being run from the command line. If you have stopped the program and want to restart it, reboot the Pi. If you have to start from the command line, press LilL3x’s button until it beeps four times to reboot the unit once you’ve determined LilL3x is working.
Still having issues? Let me know about it on GitHub! You can also contact me via the contact form on my website. You can also contact me on Discord. In fact, PLEASE let me know if you built the project! Seriously, I am kinda begging you here. Are people building this? Giving up halfway through? Built it and think it’s stupid? I have no idea! My Discord is lonely!
Note: the Onshape model is upside down.Long story.
Print all parts x1 except:
Part 8 (peg with a notch removed) – print x4
Part 4 (peg with half head) – print x2
Part 9 (cylinder) – print x2
Use the following color scheme:
Print the three big pieces (the case, the door and the lid) in the primary color
Print the small piece that looks like a hat (piece 6) in clear
Print the rest of the pieces in the secondary color
You might want to consider printing extras of the smaller pieces!
Slip the Raspberry Pi into the large case with the USB facing the top. The holes will line up with the pegs and it should click right in.
Push the speaker into the hole on the side. The wires of the speaker should face downwards (towards the Pi.) Secure it with glue.
insert the transparent piece in the oblong hole on the door. It WILL fit, you might need to tap it lightly with a hammer.
Glue the screen into the top window on the door (the smaller window, it will only fit in one.) The prongs should be towards the top. Tip: take a picture of the wired and working screen first as a reference to where the wires go.
Use the small half-moon pegs to secure the camera holder into the camera window. The notch inside the camera holder should be facing down. You can use the cylinders instead if you prefer.
GENTLY push the camera into the camera holder. It’s very touchy. Don’t try to press it all the way, just enough to clear the pegs. The camera cable will loop upwards, towards the USB ports.
Attach the wires to the screen, stashing the extra under the HAT.
Insert the button into the small square hole in the door. The “flag” should point towards the camera, inside the door.
Press the door into the front of the case.
Wrap the fan wires inside the lid and place the lid on the unit. This will keep it together for testing.
Test!
Boot the PI and SSH in. Type log to watch for any errors.
If the IP doesn’t appear by the time you SSH in, double check the wiring of the screen. If it still doesn’t work, follow the instructions in “Testing” above, making sure to end the LilL3x process.
Wake LilL3x and say “Show me what you see” to test the camera. If the camera doesn’t work when you start up, press on the camera connectors (the black piece of plastic below the lens) to make sure they didn’t come loose, reboot and try again.
Once the unit is working, insert the four pegs into the four holes to secure the door.
Advanced Configuration
Setting a device for the USB Camera
The USB camera gets assigned a device number at startup. If the USB camera is present at boot, this devices seems to be 0.
You will need to check which device your camera is mapped to by running:
v4l2-ctl --list-devices
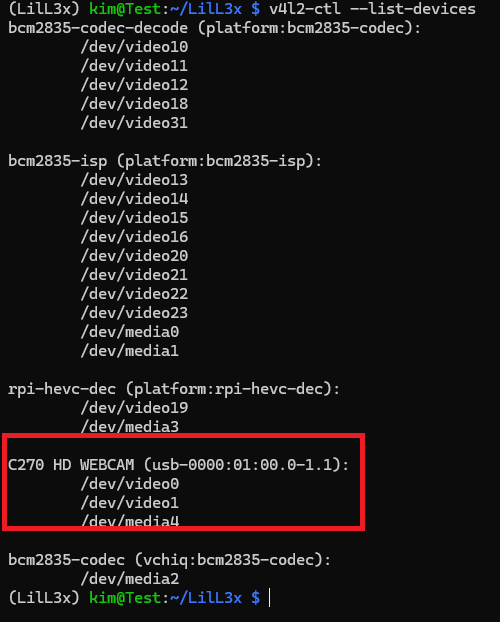
Look for your camera. There will be a list of /dev/video options, you device number is the number of the first one. Here is my setup:
You can see the webcam (circled) and it’s list of devices. The first is /dev/video0, so my device number would be 0.
Downloading Piper Voices
Piper in an offline text-to-speech engine. It’s a little slower then the other speech engines, but the novel thing about it is that it will generate those voices from a .onnx file on the fly! In addition, one could, in theory, build a voice based on a living sample, but I haven’t tried this yet.
So I have never been much of a writer, so when it came time to write my bio for the website I simply fed my resume into El3ktra (my local Ollama server) and asked her to write it for me. Then I thought, wouldn’t it be fun if the website generated a new bio each page load?
The first step was to make a text-only version of my resume for my AI to consume while building my bio, which I stored in the root of my directory.
The next step was adding php code that would talk to my Ollama server and generate a bio as a shortcode function. This can be done by editing the functions.php, found in /var/www/html/wp-content/themes/<your-theme>
function get_bio() {
    // get the resume text
    $url = "cv.html";
    $resume_txt= file_get_contents($url);

    if ($resume_txt!== false) {

            $data = [
                "model" => "llama3.1:8b",
                "prompt" => "Use Kim's Resume to write a short professional bio in the third person for Kim, less then 200 words, to put on her website.  Here is Kim's resume: " . $resume_txt]
                "stream" => false
            ];

            $ch = curl_init("http://localhost:11434/api/generate");
            curl_setopt($ch, CURLOPT_POST, true);
            curl_setopt($ch, CURLOPT_POSTFIELDS, json_encode($data));
            curl_setopt($ch, CURLOPT_RETURNTRANSFER, true);
            curl_setopt($ch, CURLOPT_HTTPHEADER, ['Content-Type: application/json']);

            $response = curl_exec($ch);
            curl_close($ch);
            $r = json_decode($response)->response;
            if (str_contains($r, ':')) {
                    return substr(strstr($r, ':'), 2);
            } else {
                    return $r;
            }

    } else {
        return "Failed to retrieve the resume.";
    }
}
add_shortcode('bio', 'get_bio');
After that, it was a matter of adding shortcode bio and viola, lovely bios generated every load.
Gotchas
The issue that I ran into was that I couldn’t get my AI to not add an introduction for the bio, ie “Here is a bio for Kim: Kim is a programmer etc..." no matter how much I begged her not to in the prompt.
The following code fixes that in a dirty way by checking to see if there is a colon in the answer, and returning everything after that colon. Yes, dirty but effective.
I was excited to see generated bios, but these took several seconds to generate the text and meanwhile my page was just sitting there. My next step was to load the shortcode after the page was done loading. For this we needed JQuery and AJAX.
The first step was to write the function that would call the shortcode (in the function.php file):
function handle_delayed_shortcode() {
     echo do_shortcode('[bio]');
     wp_die(); // Always close AJAX connections in WordPress
}
In the same file, I registered AJAX actions for both logged-in and anon users:
Basically it waits for the page to finish loading, then calls the shortcode and writes the result to the delayed-shortcode-container div. Pretty simple.
Gotchas
Now one of the first things that I ran into, using the TwentyTwentyFive theme, is that JQuery is not loaded to this theme. I determined that JQuery wasn’t running by adding an alert to the JQuery code. I had to add this to the end of my functions.php file:
So I am a novice web administrator running my own server, which hosts apache2, ollama, and whisper. I have programs that need to access these outside my local net, and I was as shocked as many are to find that there isn’t a built in way to authenticate Ollama,
I was able to get this working using Caddy. I am running Ubuntu 24.04.1 LTS, x86_64. Thanks to coolaj86 (link to comment) who got me down the right path, although this solution didn’t work for me (as I am already running an apache2 server and didn’t want to use Caddy as my webserver.)
First, I installed Caddy:
curl https://webi.sh/caddy | sh
Then I created a few API keys (I used a website) and got thier hashes using
caddy hash-password
Finally, I created Caddyfile (named exactly that):
And ports 2900 and 2800 were no longer accessible without a password. Ports 11343 and 5000 are closed both on my router and ufw and are not publically accessible at all. To access Ollama, I had to go through port 2900 and supply a username (my email) and the api key I generated.
The next step was to update my code to authenticate, which I haven’t seen spelled out anywhere although it’s pretty obvious. I am using Python.
Here is what my python Whisper request looks like: resp = requests.post(url, files=files, data=data, auth=(email, api))
And here is what my python Ollama Client call looks like (using Ollama Python):